
티스토리 뷰
728x90
반응형
this는 자신이 속한 객체의 참조값을 가리킨다.
global area에서 this는 Window, 즉 웹 브라우저의 창을 가리킨다.
다음 예제는 오브젝트에서 this를 사용해본 모습이다.
예제1 - object에서 this 사용하기
<!DOCTYPE html>
<html lang="en">
<head>
    <meta charset="UTF-8">
    <meta http-equiv="X-UA-Compatible" content="IE=edge">
    <meta name="viewport" content="width=device-width, initial-scale=1.0">
    <title>Step07_this.html</title>
</head>
<body>
    <h1>javascript에서 this 예약어에 대한 이해</h1>
    <script>
        //여기(global area)서 this는 window 객체를 가리킨다.
        console.log(this);

        let car1 = {
            name:"소나타",
            drive:function(){
                //여기에서의 this는 car1 안에 들어있는 참조값을 가리킨다.
                console.log(this.name+"이(가) 달려요");

            }

        };

        let car2 = {
            name:"그랜저",
            drive:function(){
                //여기에서의 this는 car2 안에 들어있는 참조값을 가리킨다.

                console.log(this.name+"이(가) 달려요");
            }
        };
        car1.drive();
        car2.drive();
    </script>
</body>
</html>
결과
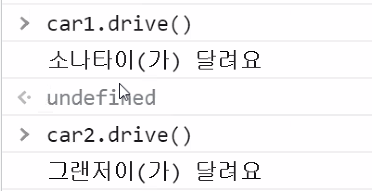
this.name으로 각각 car1과 car2객체의 name값이 출력된 모습을 확인할 수 있다.
따라서, this는 각각 car1과 car2를 가리킴을 알 수 있다.
디버깅을 해보자.
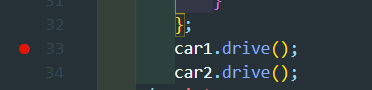
다음과 같이 car1.drive(); 구문에 breakpoint를 두고 디버깅을 시작하면,
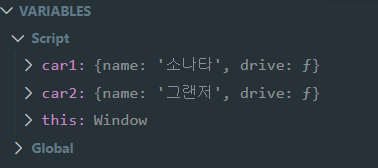
아직 car1 시행전이므로 global영역으로 this는 Window이다.
car1으로 들어가면,
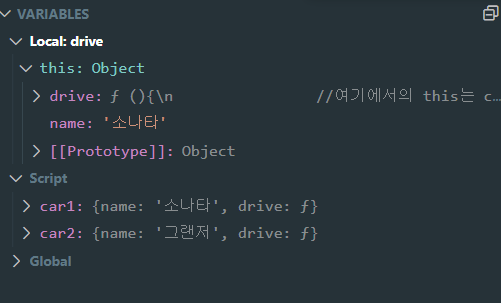
local 영역으로 들어가 다음과 같이 this가 car1 Object임을 알 수 있다.
다음 예제는 이벤트 리스너에서의 this 사용이다.
예제2 - 반복문과 이벤트 리스너에서 this 사용하기
특정 p요소 클릭 시 innerText 바꾸기
<!DOCTYPE html>
<html lang="en">
<head>
    <meta charset="UTF-8">
    <meta http-equiv="X-UA-Compatible" content="IE=edge">
    <meta name="viewport" content="width=device-width, initial-scale=1.0">
    <title>Step07_this2.html</title>
</head>
<body>
    <p>p1</p>
    <p>p2</p>
    <p>p3</p>
    <p>p4</p>
    <p>p5</p>

    <script>
        /*
            위의 p 요소를 클릭하면 바로 그 요소의 innerText를 clicked로 바꾸기
        */

       //모든 p 요소의 참조값을 배열에 담아오기
        ps = document.querySelectorAll("p");
        //반복문 돌면서 모든 p요소에 이벤트 리스너 함수 등록하기
        for(let i = 0;i<ps.length;i++){
            ps[i].addEventListener("click",function(){
                /*
                여기서 this는 ps[i]
                (코딩 시점에는 어떤 객체인지 모르지만
                여기에서는 이벤트가 일어난 바로 그 객체를 가리킨다.)
                */
                this.innerText = "clicked";
            });

        }

    </script>
</body>
</html>
this.innerText에서 this는 이벤트가 일어난 바로 그 객체, 즉 ps[i]를 가리킨다.
ps[i].innerText = "clicked";
를 수행했을 때와 동일한 결과값을 얻을 수 있다.
예제3 - this를 활용하여 반복문과 이벤트 리스너로 이벤트 일어난 특정 요소 삭제하기
<!DOCTYPE html>
<html lang="en">
<head>
    <meta charset="UTF-8">
    <meta http-equiv="X-UA-Compatible" content="IE=edge">
    <meta name="viewport" content="width=device-width, initial-scale=1.0">
    <title>Step07_this3.html</title>
    <style>

        p{
            cursor:pointer;
        }
        p:hover{
            background-color: yellow;
            font-weight : bold;
        }

    </style>
</head>
<body>
    <h1>제거할 p 요소를 클릭하세요.</h1>
    <p>p1</p>
    <p>p2</p>
    <p>p3</p>
    <p>p4</p>
    <p>p5</p>
    <script>
        /*
            위의 5개의 p요소에서 클린한 요소만 제거 되도록 프로그래밍헤보세요.
        */
        let ps = document.querySelectorAll("p");
        //반복문 돌면서
        for(let i = 0;i<ps.length;i++){
            //각각의 p요소에 click 이벤트 리스너 함수 등록
            ps[i].addEventListener("click",function(){
                this.remove();

            });

        }
    </script>
</body>
</html>
예제4 - 새로 p 요소를 만들고 body에 넣은 후, 예제 3의 기능(추가 버튼 클릭 시 삭제)이 작동하도록 구현
<!DOCTYPE html>
<html lang="en">
<head>
    <meta charset="UTF-8">
    <meta http-equiv="X-UA-Compatible" content="IE=edge">
    <meta name="viewport" content="width=device-width, initial-scale=1.0">
    <title>Step07_this4.html</title>
    <style>

        p{
            cursor:pointer;
        }
        p:hover{
            background-color: yellow;
            font-weight : bold;
        }

    </style>
</head>
<body>
    <h1>제거할 p 요소를 클릭하세요.</h1>
    <button id="addBtn">p 요소 추가하기</button>
    <p>p1</p>
    <p>p2</p>
    <p>p3</p>
    <p>p4</p>
    <p>p5</p>
    <script>
        /*
            위의 5개의 p요소에서 클린한 요소만 제거 되도록 프로그래밍헤보세요.
        */
        let ps = document.querySelectorAll("p");
        //반복문 돌면서
        for(let i = 0;i<ps.length;i++){
            //각각의 p요소에 click 이벤트 리스너 함수 등록
            ps[i].addEventListener("click",function(){
                this.remove();

            });

        }
        //추가 버튼 눌렀을 때 실행할 함수 등록
        document.querySelector("#addBtn").addEventListener("click",function(){
            //1. p요소를 만들어서
            let newP = document.createElement("p");
            //2. innerText로 출력하고
            newP.innerText ="새로 만든 p 요소";
            //3. body에 append한다.
            document.querySelector("body").append(newP);
            //4.새로 만든 요소에도 click 이벤트가 일어났을 때 실행할 함수를 등록한다.
            newP.addEventListener("click",function(){
                this.remove();
            });
        });
    </script>

</body>
</html>
위의 CSS 부분은 따로 포스팅할 예정이다.
반응형
'development > html javascript CSS' 카테고리의 다른 글
| [JavaScript] innerHTML / innerHTML과 append()의 비교 (0) | 2021.10.14 |
|---|---|
| [CSS] cursor, hover (0) | 2021.10.14 |
| [JavaScript] 요소 삽입 방법 / append(), beforebegin, afterbegin, beforeend, afterend / insertAdjacentElement() (0) | 2021.10.14 |
| [JavaScript] createElement() , setAttribute() (0) | 2021.10.14 |
| [JavaScript] if문 (0) | 2021.10.13 |
댓글
공지사항
최근에 올라온 글
최근에 달린 댓글
- Total
- Today
- Yesterday
링크
TAG
- bootstrap
- 단계별로풀어보기
- 브루트 포스
- CSS
- 문자열
- Case When
- jsp
- Oracle
- 자바
- jQuery
- baekjoon
- 고득점 키트
- 스프링
- Java
- 덱
- web
- 자바스크립트
- 파이썬
- 백준
- html
- append
- 정렬
- javascript
- R
- python
- Django
- 프로그래머스
- 장고
- brute force
- 큐
| 일 | 월 | 화 | 수 | 목 | 금 | 토 |
|---|---|---|---|---|---|---|
| 1 | ||||||
| 2 | 3 | 4 | 5 | 6 | 7 | 8 |
| 9 | 10 | 11 | 12 | 13 | 14 | 15 |
| 16 | 17 | 18 | 19 | 20 | 21 | 22 |
| 23 | 24 | 25 | 26 | 27 | 28 |
글 보관함